
End of Life
The Priv.ly project is shut down. A full-post mortem celebrating successess, and lamenting failures is given on the front page.
Develop
Want to become a Privly contributor? This guide will get you started coding, documenting, and testing for the Privly project. This guide assumes you want to dive deep into the extensible web. If you just want to use the system, you should go to the “about” page.
Beginning Knowledge
- What’s Privly? Privly gives users control over their private information. Watch this introductory video (under 2 minutes). Also, watch this technical teaser trailer (a little over 2 minutes), but don’t worry if you don’t understand them. Privly is a framework for allowing you to post encrypted content anywhere on the web. Privly is a protocol and suite of applications for controlling personal data shared via any site on the web. For consumer-focused information on what Privly is, visit priv.ly/pages/about. We also have a blog post on O’Reilly about Privly’s design philosophy.
- I want to try Privly before I start learning how to become a contributor. Check out our Give Privly a Try documentation.
- How do I report bugs against this documentation? If you see something wrong with this documentation or want something added, please submit an issue on GitHub or fork and edit it yourself.
- How do I GitHub? If you’ve never used GitHub, check out this documentation. We recommend using the terminal with git, not the GitHub native app.
Technical Vision
Every website has its own navigation structure, layout, and audience, but when you strip away these unique attributes of websites, you are left with data– chats, emails, photos– that can be treated uniformly across all websites. Operations on these data like encryption and signing, can be performed with indifference to their context and their contents.
Privly uses data indifference to create the notion of ``Injectable Applications’’ (Privly Applications), which are full web applications that are injected into the context of other web application. Since these applications are scoped to data and not layout, their properties are simplified and usable across the web.
Privly works within browser extensions by scanning web pages for specially formatted hyperlinks. When the extension detects the hyperlink, it ``injects’’ the link into an iframe that is served locally from the browser extension. Since the injected application is a full web application, the app could potentially support any web-implementable feature.
Development Status
- Privly Applications - In Alpha - Under development
- Chrome and Opera - In Alpha - Under development
- Firefox - In Alpha - Under development
- Safari - In Pre-alpha - Under development
- Internet Explorer - Not under development (no maintainer)
- Reference Implementation Content Server - Not currently a focus of development since the Privly Applications repository houses most of the functionality client-side.
Each Privly version will be released “when it’s ready.”
Where’s the Documentation?
This guide has much of the documentation you’ll need, but we also have documentation in three other locations (we know, that’s a lot, hear us out).
- privly.org- Privly.org is the official home of the Privly Foundation. It contains:
- Development Blog
- Privly Foundation organization information
- Github Wiki- The wiki permits anyone to contribute and improve content. The wiki contains:
- Developer Information
- Working Draft Specifications
- In application-specific repositories. These are mostly in the form of READMEs for installing specific components, but in the case of privly-applications several of the sub folders contain doc directories with threat models. A threat model details the security assumptions of an application and the appropriate use cases for the application.
Communication and Getting Help
First two Steps
- Join our Privly Development Google Group. We use it to broadcast announcements including information about our major development efforts.
- Follow us on GitHub. Don’t worry about cloning these repos yet. We’ll go through that later. Each repository uses the GitHub issue queue for repository-specific issues. We recommend you follow the reference implementation content server, the Chrome extension and the Privly-Applications.
IRC - Internet Relay Chat
Privly developers gather on IRC to chat informally about issues and concepts. Be prepared to wait a few hours depending on when you enter the room. Many Privly developers are on UTC -7 time.
If you’ve never used IRC before, we recommend using the Freenode’s web-based IRC client. You can also check out this documentation on how to use IRC. When you’re in your IRC client you can join us at #privly using these commands:
- /connect irc.freenode.net
- /nick "your nick"
- /join #privly
Here are a few more basics:
- Type someone's "nick" to get their attention (i.e. smcgregor: "stuff I want to say to smcgregor")
- Not everyone in the channel is actually present so be patient. They may take awhile to get back to you, but they will get back to you.
- Stop by and say hi! We're here to welcome you. Feel free to ask questions anytime.
You can also join Privly’s IRC channel using this webchat:
List of All Communication Resources
- Mailing Lists
- IRC
- Privly developers gather on irc.freenode.net, in the #privly room
- Social Networks
- Direct Emails
- Sean McGregor: privly@privly.org
- GitHub
Starting with Basics
It can be overwhelming to contribute to a new Open Source project. To make it easier, we have a set of tasks that will help you bootstrap your Privly development skills. Even if you are a seasoned web dev we recommend starting with the “level 0” because Privly has many differences from the typical web development approach.
Each of these levels have open issues on GitHub for you to comment on. Someone will answer each of your comments, so don’t be shy!
To help new developers enter the community, we have issues annotated Level 0, Level 1, Level 2, Level 3, and Level 4.
Level 0: Improve programatic code quality. (Setup) CodeClimate gives reports on code quality that highlight simplistic issues across the whole code base. We recommend cloning the Privly-Applications repository and improving the code based on the recommendations found on code climate. Then open a pull request! Don’t be afraid to submit a small pull request.
Level 1: Run the Privly-Applications build system. (Build System) Privly packages multiple Javascript applications into a bundle of privacy applications. Understanding this build system will allow you to make changes across all applications. A good starting point is to change the text in the footer to be more visually appealing. See the build system docs for more details.
Level 2: Unit testing. (Javascript, Jasmine, Karma) Privacy software requires strong test coverage to guard the security of the applications. To complete this level we recommend adding test coverage to one of the existing specs. See the unit testing docs for more details.
Level 3: Integration testing. (Selenium) Unit tests examine a tiny part of Privly and integration tests examine the system as a whole. It is important to programmatically perform all the activities supported by the application (creating, updating, destroying, etc) to prevent regressions. To achieve this level, you should See the integration testing docs for more details.
Level 4: Add continuous integration. (TravisCI, SauceLabs) Continuous integration runs the full suite of unit and integration tests every time you push commits to GitHub. Setting up Continuous Integration for your fork requires a few additions to the .travis.yml file that is shared by all the forks. See the continuous integration docs for more details.
Project: Application Project: Make a new Privly App. (Everything Related to Apps) At this point you have all the infrastructure in place to develop a new Privly App. Copy an existing application to a new directory, edit the manifest.json to reference the proper paths, and get experimenting!
Project: User Experience Project: Hack on content scripts. (Content Scripts) Browser extensions interface the privly-applications to the context of arbitrary social networks. This level of development invites you to make improvements to the User Experience of the content scripts or the options presented by the privly-applications repository itself. The core of the content scripts can be found in the privly.js file, but you should learn how these types of scripts provide functionality to an augmented browsing experience in general.
Development Setup
Prerequisites
If you want to develop either the content server or an extension, you’ll need to install the development versions of the extensions. Each extension has a different way to load an “unpacked extension,” which means you can edit the source files without needing to ZIP the extension into a single archive.
The Chrome development version is the most up to date extension at this time.
Prerequisite: You have git setup on your local machine.
Potential Pitfall: When cloning the extensions or content servers, make sure you
use the --recursive option. Otherwise you will not get all the required modules.
Chrome Extension Development Installation
- Get the source code from GitHub. You can download it by cloning the repository,
git clone --recursive https://github.com/privly/privly-chrome.git. - Open Chrome and enter “chrome://extensions/” into the address bar (without the quotes). Alternatively, you can click on the ‘customize’ icon (the 3-lined icon) on top right hand side > More Tools > Extensions
- Check “Developer Mode” box if unchecked.
- Click “Load Unpacked Extension…”
- Select the directory containing the chrome extension (where you just cloned it to).
Firefox Extension Development Installation
Note - We have migrated the Firefox extension from XUL to Jetpack. The XUL extension is now deprecated. These instructions are for the newer Jetpack architecture.
This extension is not yet packaged.
To develop this add-on, you will need: * Firefox version >= 38.0 * jpm
For jpm installation, follow the instructions as mentioned here. Firefox v38.0 and greater can be found here.
1) Get the source code from GitHub. You can download it by cloning the repository,
git clone --recursive https://github.com/privly/privly-jetpack.git.
2) Build Privly Applications.
3) In the cloned repository, run jpm run -b /path/to/firefox/browser to start the browser with the extension installed. You can find the browser path by running which firefox.
4) You can also install the xpi file in your Firefox browser –
* Generate the xpi file by running jpm xpi.
* Open the Add-ons Manager in the browser.
* Click on the tools icon on the top right.
* Select “Install Add-on From File” and provide the link to the generated xpi file.
Safari Extension Development Installation
The safari extension is still at its initial stages of development.
Before you can build and install the extension, you need a developer certificate. For more information, see Safari Extension Certificates.
- Get the source code from GitHub. You can download it by cloning the repository,
git clone --recursive https://github.com/privly/privly-safari.git - Open Safari and choose “Show Extension Builder” from the Develop menu.
- Click the “+” button and choose “Add Extension…”.
- Select the directory called “privly.safariextension” containing the safari extension inside the directory you just cloned.
- Click “Install”.
When you want to manage your extensions on Safari in the future, go to Preferences of Safari and select the Extensions tab. The privly extension can be seen here. We can enable/disable or even uninstall the extension from here.
Test your Development Extension
In whatever browser you just installed the development extension into, visit test.privly.org. This will test if the Privly extension is injecting content properly.
Content Server Setup
Your browser extension contains all the code you need to develop, but Privly doesn’t assume its users have the extension installed. In some cases it may be important for you to install the content server to your local machine to develop the content server. Only get a local version of the content server if you must have it. It is a useful exercise to stop thinking of web applications as something served from a web server, because extension-less operation is not the use case we want to emphasize.
You still need a content server account to develop! We grant accounts on dev.privly.org to anyone who is working on the Privly project. You can visit the dev.privly.org invite page and the server will send you the invite.
If you must install a local content server we have a basic setup guide that assumes you already have a working rails environment. Check out the readme on GitHub.
Component Outline
Privly is composed of three primary components:
- A set of Javascript privacy applications called “Privly Applications.” Repo.
- A Client-Side Extension (your browser extended by Privly), which changes the websites you view to support the secure injection of Privly applications. Chrome, Firefox.
- A content server, which holds the information required by privly-applications. Ruby on Rails, Python Flask.
You can learn more about how these components plug together on the development wiki.
In the following sections, we are going to cover the current implementation of the Privly server, then move onto the design considerations for the extensions.
Reference Implementation Content Server
We have two instances of the content server live on the internet:
- dev.privly.org hosts the most recent development release of the Privly server, and supports all the current functionality.
- privlyalpha.org hosts the public instance of the Privly applications.
Note: The domain “priv.ly” is used primarily for marketing purposes and is in the process of turning into a hub for Privly content servers. Developers can get an account on dev.privly.org by signing up for an invitation.
Content Server API
You can read through the content server API on GitHub. The content server is intended to be a simple key-value store that also serves a hosted version of the Privly-applications (if desired). The privly-applications repository handles most of the API integration with the content server for sessions and other considerations. It is best to copy an existing application before referring to this API.
Content Scripts
Are you a DOM hacker looking to integrate with the whole web? Content scripts are for you! Otherwise, you should skip this section.
Content scripts are added by browser extensions to the sites you visit. Every browser has its own set of extension capabilities and security restrictions, which makes simultaneous development on many platforms difficult. Although running scripts within different browsers is a mess, they all support injecting privileged applications into the context of an unprivileged host page like a social network. Most of this “magic” happens inside the Privly.js file. The current version of the privly.js file can be found in the Chrome repository. Privly.js performs the following steps when it is loaded into the host page, but unless you are extension hacking you don’t need to learn this process:
- Find all plain text URLs pointing to a Privly server and turn them into hyperlinks
- Correct possible indirection on Privly links by:
- Checking the text that is displayed in the link for a URL and replace the href attribute with the displayed URL
- Look at all attributes on the anchor element and replace the href element with Privly URLs found on other attributes. This handles cases where the anchor element has a tracking URL for the href, but the final URL is still an attribute
- Replace Privly links with an iframe element pointing to the linked content
- When the iframe content is rendered, it posts a message containing the height of the content in the iframe.
- Privly.js receives the posted message and resizes the iframe to match the size of its contents
Privly User Interface
A noteworthy design goal of the Privly extensions is to make the extension operation invisible to the user. If the end user is not aware that the extension is installed and they are viewing Privly-protected content, then the system is properly architected. When developing for Privly, always ask yourself whether it is necessary for your user to see your development work. For instance, you should try to avoid anything that:
- Adds configuration steps.
- Requires the user to read text to understand what the system is doing.
- Requires the user to understand the system– most users will not understand Privly.
- Results in an easiest path that makes the user compromise their data. Users are “lazy” and will do whatever is easiest.
To illustrate these challenges, we recommend following any significant development effort with a think aloud study. You will be sobered by the results when the user clicks exactly where they shouldn’t.
Privly URLs
Privly shares content based on sharing URLs. Only two parameters are currently required of any link that will be injected into the page:
privlyInject1This is a string whose presence will result in the injection of the application associated with the link.privlyApp=APP_NAMEThis parameter determines which application should be injected with the associated URL.
We have more details on the URL specification on the wiki.. The typical process for generating a Privly URL is to post content to a content server, which then returns a URL for post processing by the Privly-application.
If you create a new Privly Application, you need to make its directory “web accessible” in Chrome before it will successfully inject. See the examples in the Chrome manifest.
Link-Based Encryption
We want to make it computationally impossible for someone to decrypt content without having access to the link a user shares on social media. “Link discoverability” as a security property requires the server not have access to part of URLs that store the key. The realization of the requirement is subtle since it employs a hack on little-known web standards.
Web browsers don’t send the anchor (the part to the right of the “#”) when the client requests web content. This allows for users with a browser extension (Privly) to decrypt content they encounter on the web without the content server ever seeing the decryption key. In the event the user does not have the browser extension installed, they can still read the content by clicking the link. The content will be decrypted, but if the content server is actively attacking the content, it will be able to recover the key. A more thorough discussion of the security properties of this approach can be found on GitHub or on the safety page.
The Advantages of Link-Passwords Only
- Users don’t need to have an extension to view content, but we can prompt them to install the extension every time they click on Privly-type content. Without this sharing model as the starting point, it will be difficult to get users to adopt the extension. This is the first step of our roll-out strategy.
- The data is protected from the host page by a terms-of-service on the content server
- Compromising a post requires compromising the host page
The Disadvantages of Link-Passwords Only
- The remote server has access to the password if the link is read without the extension
- If someone compromises the security of the host page they have access to the decrypted content
Messaging Between Scripting Contexts
Privly’s architecture provides security by isolating different scripting environments that communicate through message passing. Each message has a means of verifying the authenticity of the sender, meaning the scripting environment knows who sent the message. Depending on the context of the scripting environment, a non-web standard message interface specific to the platform may be used.
To reiterate definitions stated elsewhere, the scripting environments are:
- Extension Background Script: Extension architectures typically have some form of scripting environment that is shared across all the browser’s tabs. Here we refer to this background script because the environment is operating in the background of the browser and you typically never see a rendered HTML document for the page – even if the background page is written in HTML.
- Content Script: The content script is a script that is loaded on top of a web page. In some cases this script is sandboxed from the scripting environment of the host page, but since this is neither a universal security property nor a particularly reliable one it is best to assume that the content script is potentially controlled by the host page. Thus no messages sent to the content script can contain privileged information.
- Host Page Scripting Environment: The host page’s scripting environment is considered to be the DOM of the web page or the scripting context loaded on top of that DOM.
- Privly Application: The browser extension Privly Application scripting environment is the scripting environment that loads in an iframe when it is injected into a Host Page. This scripting context has a src attribute in an iframe at a URL similar to “chrome://,” “chrome-extension://,” or “safari-extension.”
Each message that is currently supported is listed below with the sending environment on the left and the receiving environment on the right.
Extension Background Script -> Content Script
When a content script or Privly Application changes a global option, that option may be broadcast to all the content scripts and Privly Applications. The message will be received as a JSON object containing:
{ action: 'options/changed',
  option: optionName,
  newValue: optionValue
}
Where the optionName is one of: “options/privlyButton”, “options/injection”, “options/whitelist/domains”, “options/whitelist/regexp”, “options/contentServer/url”, “options/glyph” and the newValue will be the corresponding JSON object.
Host Page Scripting Environment -> Privly Application
None at this time. We plan to add support for requesting typographic changes from the Privly Application.
Content Script -> Host Page Scripting Environment
None (the content script does not communicate with the scripting environment of the host page but they both make changes to the host page’s DOM).
Content Script -> Extension Background Script
Since content scripts cannot directly access extension local storage in order to retrieve or set option values, Privly.options.* functions are not available for content scripts. Privly options interface provides a message passing channel for content script to retrieve or set options.
-
{ ask: 'options/*' }Payload:
{ ask: OPTION_INTERFACE_NAME, params: [param1, param2, ...]}Listen at:privly-application/shared/javascripts/options.jsContent scripts can use this message to directly retrieve option values or set option values. Option values are returned as message response payload.
OPTION_INTERFACE_NAMEis formatted asoptions/METHOD_NAME. The method name is the function name that you want to call.Examples:
{ ask: 'options/isPrivlyButtonEnabled' }{ ask: 'options/setPrivlyButtonEnabled', params: [false] }{ ask: 'options/isInjectionEnabled' }{ ask: 'options/setInjectionEnabled', params: [false] }{ ask: 'options/setWhitelist', params: [['facebook.com', 'twitter.com']]}
Privly Application -> Extension Background Script
Privly applications can change the extension’s options, which are stored across extension environments in a key/value store similar to localStorage. When the options change the extension wants to know about the changes so the application messages the relevant option to the extension context.
-
{ ask: 'options/changed' }Payload:
{ ask: 'options/changed', options: String, newValue: Any }Send at:privly-application/shared/javascripts/options.jsAll background scripts will receive this message after a option value is set or changed by calling option interfaces provided by
Privly.options.options: The option interface name. It is always prefixed withoptions/. You can use exactly the same name to send request toPrivly.optionsbackground script in order do get specific option values.newValue: The new value of this option.
Privly Application -> Content Script
Privly’s architecture does not assume that the host page will perform these actions, but since we would like the host page to explicitly support Privly’s iframe injection these messages are broadcast to the host page’s scripting environment as well.
- Resize iframe
Forthcoming:
- Destroy iframe
- Hide iframe
- Show iframe
Privly Applications
Privly Applications are included in your browser extension or content server as a
git module. This means if you used the --recursive option when you cloned the extension
you have the Privly Apps automatically. If you don’t see files in the directories
listed below, you should open the terminal in your privly-applications directory
and issue git submodule init then git submodule update.
The paths are:
- privly-chrome: /privly-applications
- privly-jetpack and privly-firefox: /chrome/content/privly-applications
- privly-web: /public/apps
Privly Applications Architectural Pattern: MVC
Model-View-Controller (MVC) is a common design pattern throughout web development. In the Ruby on Rails world, the “model” refers to the data, the “view” refers to the templating and layout, and the controller forms a layer in between that manages authentication, authorization and other tasks. The MVC pattern of Privly Applications is similarly inspired, but since the perspective of the pattern shifted to the client our realization of MVC will feel different to experienced developers.
Definitions:
- The
modelhandles tasks related to data transformations, such as encrypting plain text for creating a Privly content. - The
viewis the user interface shown as HTML pages in the browser. Whereas typical web development will render the HTML from templates when the content is requested, we render the HTML pages before packaging them into the extensions. By building the HTML before the request, we can reduce the trust we place in the remote server. These pages are usually generated from extending existing base templates (called aprototype view) in order to share similar user interfaces between different Privly Applications for the same kind of operations. - The
controllerscripts of Privly Applications connect theviewand themodel.
Still confused? First let’s review different use cases of a Privly application. Generally, a Privly application has three use cases:
- show When the link is injected into a host page as an iframe or accessed directly. Since the user will often edit existing content when they are viewing it, we consider the
showuse case to be the same as theedituse case. - new When the user is creating a new link that will be introduced into the host page.
-
seamless
Seamless is a new method of creating content. When creating standard
newcontent, the users are creating content in a separate, standalone window and the content is created when users click ‘Save’ button. However when creating content seamlessly, the users are creating content without leaving the context of the host page. Here we place a link into the host page’s form element and continually update the content associated with the link with an iframe overlaid on top of the form element.
Each of these use cases invoke the MVC pattern. We detail how in the following sections.
View
The view layer is the user interface layer. Currently we have
three view prototypes: show, new, and seamless. As you can
see, these three view prototypes provide templates for the
three use cases mentioned above. We offer
templates
for application
developers to accelerate development. Those templates
can be inherited, extended or overridden.
For example, our show view prototype provides a textarea for users
to input contents. However you can override the textarea with a drag/drop
landing area.
Note that if your Application supports seamless view, it can
also provide a seamless_ttlselect view, which is used to display
a timed destruction menu for users. If you don’t want to change
menu styles or change menu item orders, using our default prototype
code is enough for your custom Application.
Model
The model layer handles data transformations such as:
-
How should the user inputted content in the view layer be transformed into a Privly JSON object? This task is used in creating or updating the content.
Example:
- PlainPost App: no transformations are made.
- Message App: the transformation is encryption.
- Image App (under development): the transformation is image serialization and encryption.
-
How should we transform a Privly JSON object to the content that the view layer can present? This task is just a reverse of the above task. It is used in viewing the content (
showcase).For example, in the Message App, the transformation is decryption according to the encryption key attached in the link.
-
What are the
seconds_until_burnoptions for this App? An Application can assign its ownseconds_until_burn(aka. TTL, Time To Live) options.
You are free and welcomed to implement your own functions or interfaces in the model. Those interfaces may be useful in the controller layer.
Note: generally all interfaces of the model layer should be async by returning a Promise which will later be resolved. The async feature of a model doesn’t have much effect in current Privly Applications like Message and PlainPost, however it does bring more flexibility to developers.
Controller
The controller layer connects the model layer and view layer. It can offer extra actions for view layer events. For example in the Message app, when a new link is created, we have to concatenate the encryption key after the link. Another example is when we are presenting the content of a Message app, we should do a Markdown rendering. This kind of task should also be completed in the controller layer.
Why All this MVC Complexity?
There are many possible use cases for Privly applications. Separating the Model, View, and Controller allows for different apps to share the same code and reduce the “attack surface” of the architecture. It also means your applications will benefit from the collective intelligence and auditing of the entire community. The more code you can re-use, the more secure your users will be.
Build System
Privly abstains from using any server-side templating of applications because this would represent an attack vector on the user’s privacy. However, since applications must live together in a coherent set of Privly Apps, it is necessary to render applications from template files to static HTML.
You can find the setup instructions for installing the build system in the build.py file.
Once you have all the prerequisites installed, navigate to your privly-applications directory and issue:
python build.py --platform=chrome
Note: Use Python 2.X
The apps will then be built for the Chrome extension. Now you can change a template and it will change all the apps. You can also copy an existing app, update the manifest.json file, and build the apps for your “new” app to automatically be included in the navigation.
We have several simpler issues whose only knowledge prerequisite is working with the build system. If you open a pull request for these Level 1 issues you should commit changes to the templates, but not to the HTML files themselves since it is better for the privly-applications maintainers to run the build when they merge the changes.
Privly Testing 101
Before learning the Privly testing architecture you need to know the basics of testing for software engineering.
If you are already experienced in writing unit and integration tests, you can skip over the following simile.
Begin simile: Consider a car. A car is a big system made up of smaller components. Before the car is manufactured each component of the car (engine, fuel tank, exhaust, steering wheel, gear, etc) is tested in isolation before plugging them together. You want to know whether pressing the accelerator will tell the engine to speed up, turning the steering wheel will tell the wheels to turn, turning the ignition will begin the ignition sequence, etc. If you test all these components (units) after they are combined into a whole car a failure in a single component will cause a cascading failure whose root cause is difficult to determine. By testing the components (units) in isolation, you build a much more robust system.
But what about the car (system) as a whole? Even when individual components (units) work perfectly, the combination of those components could fail. This is why you also want to drive the whole car around the neighborhood a few times (integration tests) to ensure everything is working together.
Privly as a car is a multi-component system whose individual functions should be tested with unit tests and the whole system should be tested with integration tests.
The smallest component that deserves testing is called a unit. In the case of Privly, units are usually javascript functions. Unit tests are code that test these units. Keep in mind that Tests are nothing but code. Just say this line 5 times to yourself: “Test code tests source code”. /End simile.
Privly has three layers that must all be tested on the unit level and as a whole system: The content server, the extension, and the privly-application.
Types of Tests
Unit tests: Makes sure that the individual javascript functions (units) that make up the privly codebase are running properly across all browsers.
Integration tests: Makes sure Privly applications, extensions, and content servers are able to work in concert.
Content server tests: Makes sure content server is working as expected. This is not a focus of this guide because content servers have their own commonly used and well documented testing infrastructure that you do not need to worry about.
Test Language, Test Runner, Test Syntax, and Environment
This is the most difficult aspect to understand about Privly’s testing infrastructure since it requires understanding several layers of related systems. To simplify things, we don’t recommend you figure out how everything fits together. The best way to get started is to get the existing tests running, then to copy and modify the existing test to cover a new case. Still, you need to know a few things before you get started.
To run tests, you need a testing environment where the tests and the system as a whole can execute. Since Privly runs in web browsers and in web browser extensions, we have a very large number of target environments. However, when you are developing new tests and functionality you do not need to develop against all the potential platforms. When developing your tests will run in either your Chrome or your Firefox browser. To support testing on all the platforms and to enable testing in our Continuous Integration system, we also integrate tests with SauceLabs.
SauceLabs is a browser virtualization service that gives you the ability to run both Unit and Integration tests on hundreds of different platforms. You don’t need to use Sauce to run tests while you are developing since you can use your local browser, but you do need to use SauceLabs if you run tests in the continuous integration system.
Your local browser or the SauceLabs browser are the environment in which tests run, but what are the tests written in and what drives the tests in the browser? The answer is different depending on whether you are talking about Unit or Integration tests.
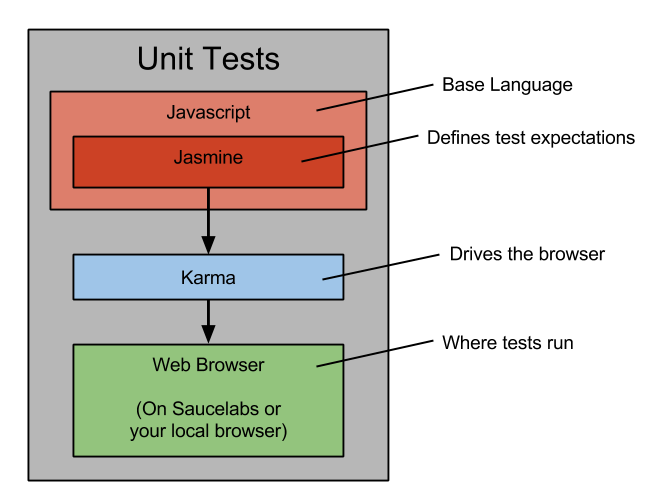
Unit Test Infrastructure
Unit tests are written in JavaScript with a library called Jasmine that declares (expects) a unit to produce a particular outcome. When writing Jasmine tests you should read the Jasmine introduction then copy one of the existing tests in a privly-application.
But how do the Jasmine tests run in the browser? We use Karma as a “test runner” to connect the tests (written in Jasmine) to a set of many test iframes running in the browser. A brilliant part of Karma is that you can set it to monitor your files and re-run a test set every time the files change. Karma will change the way you develop in JavaScript, for the better.
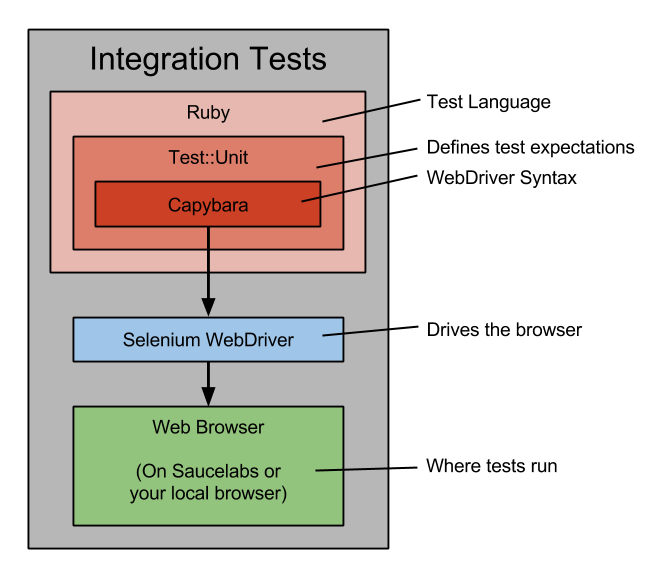
Integration Test Infrastructure
Integration tests are written in Ruby’s Test::Unit – think of this as the “Jasmine of Integration Tests,” which will make more sense after you write your first Jasmine tests. These Test:Unit tests control your browser or SauceLabs’ browser via Selenium Webdriver, which is essentially an API and communication protocol for “driving” a web browser with code – think of this as the “Karma of Integration Tests”. To make this “web driving” more expressive, we use a library called Capybara. Capybara’s only purpose is to make things like testing AJAX functionality less painful. If you really want to you can write tests without using Capybara, but it will be painful.
What Now?
This section introduced the concepts, but the unit testing and integration testing sections go into the details. We recommend you start with writing a simple unit test before working on an integration test.
Unit Testing
Unit testing breaks the components of the applications into the smallest testable pieces. In the case of the Priv.ly Project the smallest testable pieces are individual Javascript functions.
When developing for Privly, you should strive for 100 percent unit test coverage and reasonable integration tests. The testing infrastructure will then run these tests on the multitude of supported platforms.
Specs: Jasmine
Specs for unit testing are written using a Javascript library called Jasmine. This is essentially a library of functions to make unit testing easier. Current Privly specs can be found in the “test” directories of the privly-applications repository (example).
Specs are intended to be run independent of HTML files, meaning if the function you are testing interacts with the DOM you will need to create the required DOM elements using Javascript before the test executes. Similarly, tests often call other functions or are expected to be called by a particular function. To achieve proper unit isolation, you should replace functions that are not being tested with a shim function that specifies the expectation of the tested function. An example is included below:
// We are testing the function "fu," that calls "bar"
// and expects "bar" to return either "hello" or "world"
it("says hello", function() {
  bar = function(){return "hello";};
  expect(fu()).toBe("I called a function that said 'hello'");
});
it("says world", function() {
  bar = function(){return "world";};
  expect(fu()).toBe("I called a function that said 'world'");
});
Unit Test Runner: Karma
The unit tests run in a variety of web browsers using the Karma test runner, which is a system that opens all the test files in web browsers. When you are developing a new Javascript function, we recommend opening Firefox and Chrome with Karma. Anytime you save a “watched” file, the unit tests will re-run and tell you which tests pass and fail. No more hitting refresh in the browser!
For more details on running your unit tests on Karma, you should read the README.
Test Coverage
Your goal as a Privly developer is to have 100 percent unit test coverage on your code. CodeClimate will record test coverage information for you if you configure it. When code contributions are merged they will be merged into the project’s code coverage statistics.
Threat Models
Threat models detail the security expectations of a Privly App. Since every Privly App has different capabilities, these threat models are specific to particular Privly Apps. While threat models are an industry standard, the Privly project views them with suspicion because they often assume the user is a strong agent of their own security. However, while technical users can reasonably be expected to use privacy software properly, this is not the case for “mass market” software. All Threat Models should take into account the propensity for a user to do the worst possible thing for their privacy. For instance, if your application relies on the user protecting their own private key you can expect the app to not test very well against the general user base.
You can view the current threat models in their application “doc” directories of the privly-applications repository. Here are the Threat Models for PlainPost and ZeroBin.
When writing a new application, you should be explicit about the application’s threat model. Otherwise people will unfairly criticize your application, or worse: you will endanger your users.
Integrations
Privly is built for extension frameworks on many different web browsers running on several different operating systems. This increases the complexity of testing Privly beyond what is reasonable for a local development environment. To facilitate more robust cross-platform development we have a cloud-based testing infrastructure capable of testing across the multiplicity of browsers, extensions, and operating systems. In these sections you will learn about setting up this cloud infrastructure.
Integration Testing
If you have not read it yet, you should first refer to the Testing 101 section of the docs for some important background.
Integration tests are built around “activities,” like creating or destroying content, or viewing content injected into a web page. Where unit tests breaks Javascript components into individual functions and tests them, integration tests ensure everything is plugged together properly.
Running integration tests on many different browsers, operating systems, and especially different extensions is a challenging task that Privly’s architecture has made easy. First, you should become acquainted with the constituent parts.
Test Runner: Selenium Webdriver
Selenium Webdriver is an excellent testing framework for programmatically controlling user actions in a web browser. If you do any serious web development, you should become well acquainted with Selenium for running scripts (specs) that describe the expected behavior of tests.
Specs: Ruby Unit Tests and Capybara
Selenium Webdriver needs a scripting language to run the tests because vanilla Webdriver doesn’t handle AJAX requests very well. Ruby’s Capybara supplies the functions for interacting with the browser. We then write the expectations for these tests using Ruby’s unit testing framework.
So in summary, Privly uses Selenium Webdriver to control webbrowsers as they execute a script written with Capybara. The tests will fail if there is an error or if the Ruby Unit Test fails.
You can view examples of testing specs in the privly-applications test directory
For more details on running the integration tests locally, you should read the README. You can also run the tests remotely using SauceLabs.
SauceLabs
Everyone has bugs they can’t replicate because the devs don’t have access to a particular browser and OS combination. It is even more difficult to develop against all the potential platforms. SauceLabs makes many different browsers and operating systems available in a browser virtualization service. This will be the coolest thing you learn today.
Another important aspect of our integration with SauceLabs is that we are able to load the browser extensions and test this more privileged scripting context. You don’t need to learn how we accomplished this since it can be started with a command.
For more details on running tests on SauceLabs, you should read the readme.
TravisCI
TravisCI is a continuous integration service that runs every time commits are pushed to GitHub. You should setup this service to make integration testing easy and automatic on the privly-web, privly-chrome, and privly-firefox repositories. The steps below assume you already have an account with SauceLabs.
- Sign up for an account on TravisCI.
- Tell TravisCI to monitor your repositories for commits. We recommend monitoring all of your Privly forks.
- Install TravisCI’s command line utility
- Find your SauceLabs username, access key, and API URL (https://YOUR_USERNAME:YOUR_ACCESS_KEY@saucelabs.com/rest/v1/users/YOUR_USERNAME).
- Change into the directory containing the .travis.yml file (usually at the root of the repository).
- Update the .travis.yml file
to include your secure environment variables. The current .travis.yml files
all have numerous examples of the secured variables, so you should add the
results of the commands below to the appropriate line.
travis encrypt SAUCE_USERNAME=YOUR_USERNAMEtravis encrypt SAUCE_ACCESS_KEY=YOUR_ACCESS_KEYtravis encrypt SAUCE_URL=YOUR_API_URL - Push commits to GitHub then watch it build in TravisCI!
Potential pitfall: The “secure environment variables” you added to the .travis.yml file will not be displayed by Travis regardless of whether you encrypted them properly. If you are having trouble with adding the variables, you should try SauceLabs configuration guide since it will encrypt the tokens for you if you enter the proper repo.
Potential pitfall: Not many tests will run on SauceLabs on pull requests because TravisCI’s secure environment variables will not be decrypted by Travis. This means tests will need to run on your fork instead of the pull request. Since these integrations are immensely complex, we recommend opening pull requests early so you can get help setting things up.
Issue Labels
The Priv.ly Project uses the GitHub issue tracker for all its issues. While some issue labels are not included on this list, all issues will be labeled with the following categories:
- Importance: Critical, Major, Normal, Minor
- Status: New, Active, Needs Review, Needs Work, Postponed, Reviewed and Tested
- Type: Bug Report, Task, Feature Request, Support Request
We also have special labels for UX issues, Easy issues, and bigger issues that are better classified a Project.
To help new developers enter the community, we have longstanding issues annotated Level 0, Level 1, Level 2, Level 3, and Level 4.
Coding Standards
General style guidance:
- Most important rule: Don’t use tabs for whitespace.
- The style guides below were adopted in 2016. If a file violates the style guide, you can optionally update the file in a separate pull request. If you don’t want to update the code for the style guide, then you should use a style consistent with the current file.
- For JavaScript, the following coding standards should be used (in order of precedence): jQuery, AirBnB. When programmatically linting your code, JSHint takes precedence over JSLint.
- For CSS and HTML, use MDO’s standard
- You should be acquainted with Frank Jones since he will influence many of your design decisions. In short: design for non-sophisticated users.
Workflow: Forks, Branches, Tags, Releases, and versions:
- Versions are currently written as 0.MAJOR.MINOR.
- The remainder of these standards are summarized well by a graphic found on Vincent Driessen’s blog and Atlassian’s Git Workflow guide.
- Feature branches should be forked from “develop” branches (if they exist for the specific repository).
- We will not merge pull requests directly into master. Pull requests should be made to the “develop” branch, or a feature branch when appropriate.
- We recommend you create a “feature branch” when you are developing a feature.
Names within Git for Branches, Tags, and Releases:
- master: The release branch for the repository. These should have explicit version numbers.
- release-v0.MAJOR.MINOR: The branch we are preparing for release. If the develop branch is ready for immediate release, we will skip this step.
- develop: The working branch for the repository.
- issue-#NUMBER: The branch for fixing a particular issue. If it is a security related or a big UX failing, we will “hotfix” master and issue a new minor release. Otherwise the issue will be merged into “develop.”
- feature-BRANCH-NAME: A bigger feature that is not ready for merging into develop will be developed on a feature branch.
- experimental-BRANCH-NAME: A feature that may not ever be merged into the develop branch because it is still experimental.
- PLATFORM-extension-master: Sometimes it is necessary for the privly-applications repository to have different versions for different platforms. We are in the process of phasing these out, but for now they are periodically updated from master.
- gsoc-BRANCH-NAME: These are branches GSOC students are working on. You can think of them as feature branches.
- v0.MAJOR.MINOR: A tag for a release.
Requirements before you open a pull request:
- Click test your changes (make sure code works in a browser) before opening a pull request, but feel free to open a pull request when you need help with something. Pull requests are easier to help than an uninformed statement of “X is not working!”.
- You should “lint” your JS code before submitting a pull request. Here is an example online linting tool, but many options are available.
- If you have your repo hooked into TravisCI, you should check the results before you ask other people to review it for merge.
- Don’t introduce any code that you don’t have a right to gift to the Privly Foundation’s Open Source license and copyright.
Requirements after you open a pull request:
- You should respond to comments and work with the maintainers or other contributors to make the code appropriate for merging.
- You should know that the build script does not fully test the pull request’s commit since pull requests do not run on SauceLabs.
Requirements before code is merged:
- Your code should be unit tested, if appropriate for what you are submitting.
- Your code should be integration tested, if appropriate for what you are submitting.
- If you are having a lot of trouble with testing on Privly, then we can help write your tests – but we ask you help make changes to your code that the tests indicate should be made.
Final Notes
Thats it! Please remember:
- When you encounter a problem, don’t hesitate to mail the mailing list or drop into Privly’s IRC channel.
- You can improve this guide by forking it on GitHub and adding/editing details.